
A Tmux Crash Course Tips and Tweaks
A Tmux Crash Course Tips and Tweaks
A Tmux Crash Course Tips and Tweaks
A Tmux Crash Course Tips and Tweaks
Tonatiuh Núñez
Tonatiuh Núñez
Tonatiuh Núñez
May 13, 2016
May 13, 2016
May 13, 2016
~ Intro
If you are one of those devs who uses the terminal a lot and ends up with way too many tabs open, or practices pair programming, then this post is for you. During the last months, I’ve started using Tmux a lot. Since I’ve found it to be very useful, I thought I would write a post where I share a few recommendations and pro-tips. I’ll show you what Tmux is and how to use it in combination with Vim to make a more effective and elegant use of the Terminal.
So, this is what we’ll cover:
Tmux basics.
The best of Tmux
Windows
Panes
Sessions
Fast text navigation and copying
And a very neat pair programming feature
Tweaks to improve Vim integration.
Colorscheme background
Static cursor shape
Indentation at pasting
A few extras to enhance the Tmux experience.
Tmuxinator for session automation.
Changing your color of your Tmux bar.
An important thing to bear in mind, this is the tool stack I had installed while writing this post, I tested what I say here with these versions:
Tmux 1.9a
Vim 7.4
iTerm 2.1
Mac OS (Mavericks and Yosemite)
Let’s start!
~ The Basics
What is Tmux?
Tmux is a tool that allows running multiple terminal sessions through a single terminal window. It allows you to have terminal sessions running in the background and attach and detach from them as needed, which is very useful. Later on, we will see how to make the most out of that feature.
Here’s a screenshot of a Tmux session:
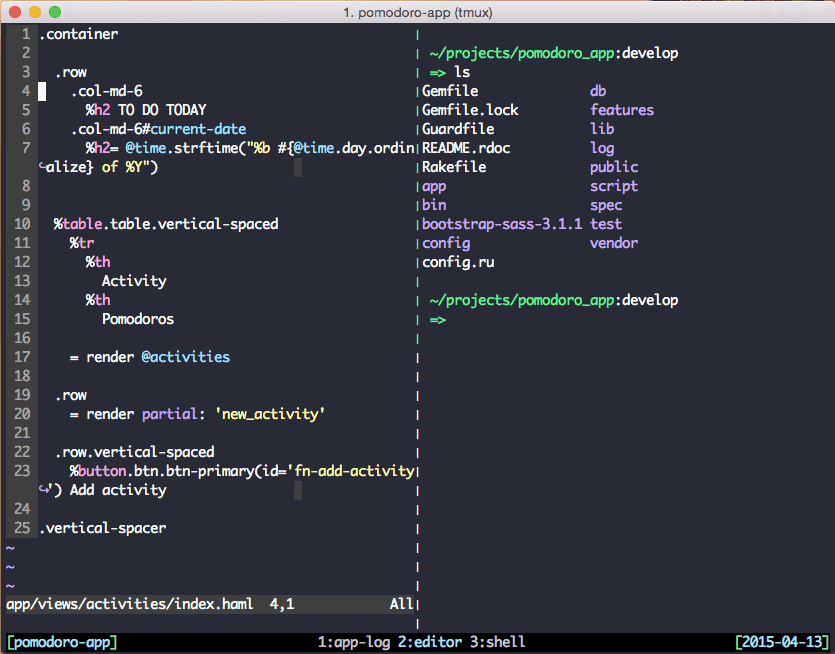
What you see in the image:
– Left: Vim
– Right: a system’s shell
– Bottom-left: the Tmux session name (“pomodoro-app”)
– Bottom-middle: the current Tmux windows (“app log”, “editor” and “shell”)
– Bottom-right: the current date
How to install Tmux?
In Mac OS:
Install Homebrew
ruby -e "$(curl -fsSL https://raw.githubusercontent.com/Homebrew/install/master/install)"
Install Tmux:
brew install tmux
In Ubuntu:
Run this on the terminal:
$ sudo apt-get install tmuxThe Tmux prefix
In order to isolate its own keyboard shortcuts from other shortcuts, Tmux provides a shortcut prefix. When you want to trigger a Tmux shortcut you will press the Tmux prefix and then the Tmux shortcut key. The prefix that Tmux uses by default is Ctrl-b (“Ctrl” key in combination with the “b” key). For instance, let’s say you want to trigger the shortcut that lists the current Tmux sessions, which is the s key. Here is what you will need to do:
Press
Ctrl-bkeys (Tmux prefix)Release
Ctrl-bkeysPress the
skey
A few recommendations:
If you have not already mapped the ctrl key to the caps-lock key and vice-versa I suggest you do it.
Calling ctrl from the caps-lock key is very practical. This is because when coding you need to call ctrl very frequently. Moreover, it is a lot easier/quicker given the caps-lock key aligns with the default position of your fingers in the keyboard.
I recommend changing the Tmux prefix to
Ctrl-a. Once the Ctrl key has been set to the caps-lock key, it gets a lot easier/quicker to callCtrl-ainstead ofCtrl-b, because the new prefix keys are very close to each other on the keyboard.
Here is what you need to add in your ~/.tmux.conf file to change the prefix to Ctrl-a:
unbind C-b
set -g prefix C-a
The config file
~/.tmux.conf is a file that Tmux reads every time a new session opens. It’s where the customizations for Tmux need to be placed. Suggestion: in the case that you need (and chances are you will) to apply a new change made to the without opening a new session, you can add the following line to the ~/.tmux.conf file:
# bind a reload key
bind R source-file
This way, once you have added a new change to the ~/.tmux.conf file, just press ctrl-b R to reload your configuration without having to open a new Tmux session.
~ The best of Tmux
Quick note: the screenshot shown here may differ slightly from what you see by default when you install Tmux. This is because I modified the status bar. If you want to do the same follow the steps on the “Pimp your Tmux bar” section of this post.
Panes
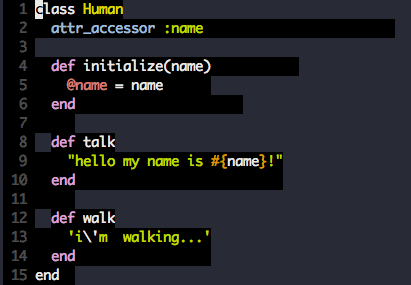
I like the idea of dividing the screen vertically, so that on one side of the screen I have Vim and on the other side I have the output of my code. I could even have another console if I wanted to. Here’s how Tmux makes it happen:
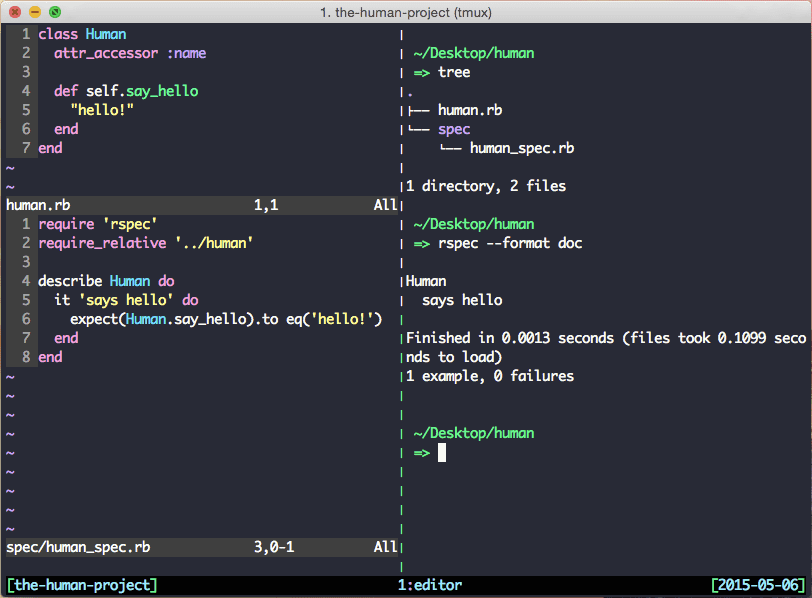
What you see in the image:
– Left side: Vim (at the top: a Ruby class file, at the bottom: a test file for the Ruby class).
– Right side: a bash session.
A vertical pane is easy to create. Once you have launched a new Tmux session just press “Ctrl-b %” and a new vertical pane will appear. Also, if what you need is a horizontal division then press “Ctrl-b “”. Navigating through Tmux panes is easy, just press the Tmux prefix and then any of the direction arrows depending on which pane you want to go.
Windows
In Tmux, a window is a container for one or more panes. Tmux windows allow you to arrange multiple panes inside windows depending on what you need. For instance, in my case I usually have one window called “server” for running the app’s server (where I can see the log), another window called “editor” (where I do the coding). One pane for Vim and another for running the code tests. And another window called “shell”, which is a bash shell where I can run system commands. Tmux windows are useful since they allow users to allocate panes inside of them, to see more about each pane by going to the window that contains it. This is an efficient use of the available screen space.
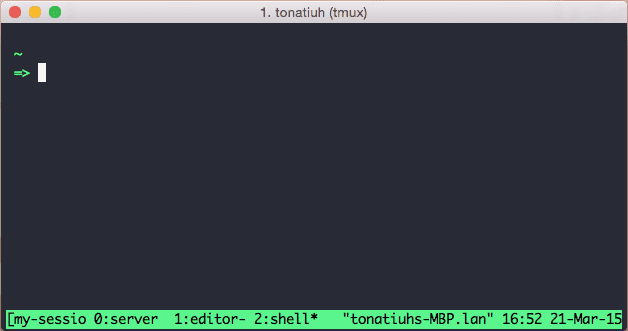
The list of existent windows in a Tmux session displays at the bottom of the screen. Here is an example of how Tmux displays (by default) the list of windows created. In this case, there are three windows: “server”, “editor” and “shell”):
In order to create a new window you need to press “Ctrl-b c”. To navigate through windows press Ctrl-b followed by the index number of the window you want to go. The index number displays next to the name.
Sessions
A Tmux session can contain multiple windows. Sessions are a neat feature; I can create a Tmux session that is exclusive to a particular project. To create a new session just run the following command on your terminal:
$ tmux new -s <name-of-my-sessionTmux sessions remain alive until you restart your machine or you explicitly kill the session. As long as you don’t restart your machine, you can jump from a project’s session to another as you need it.
Navigation through Tmux sessions
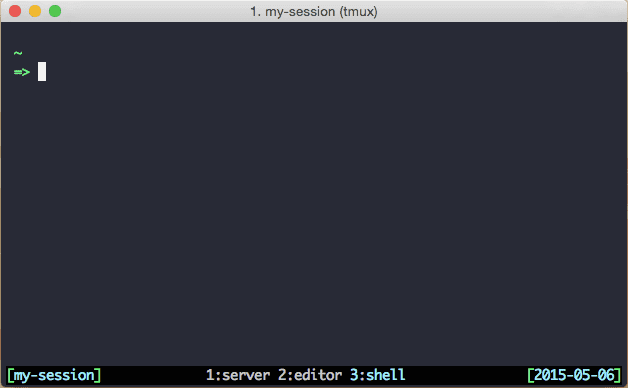
To get a list of the existing sessions, press Ctrl-b s. Here is an example of what Tmux will show you:
Each session listed has an ID number, starting from zero. In order to go to that session type the session’s ID number in your keyboard. In the case that you are not in Tmux but you have one or more sessions running just use:
$ tmux attachThis command will take you back to your Tmux sessions.
Fast text navigation and copying
I always disliked the fact that to copy content from iTerm2 quickly you need to use the keyboard plus the mouse. I think that there should be a quicker way to do it without having to use the mouse. Fortunately, Tmux allows for that, since it is run from the command line, where the use of the mouse is not allowed.
Navigate text
Tmux allows for text navigation in a way that is very similar to Vim. You know, where the k key goes one line up, w moves one word forwards, and so on. Yet you can increase Tmux’s similarity with Vim by telling it to use the vi mode. Here is what you need to add in your ~/.tmux.conf file to accomplish this:
# Use vim keybindings in copy mode
setw -g mode-keys vi
Send copied text to System’s clipboard
By default, when you copy text from Tmux, the text is only available to be pasted inside that same Tmux session. In order to make that text available to be pasted anywhere, you have to tell Tmux to copy to system’s clipboard. Here’s how to do it:
Install retach-to-user-namespace, this is very easy with brew, just run the following command:
brew install reattach-to-user-namespaceUpdate ~/.tmux.conf file
# invoke reattach-to-user-namespace every time a new window/pane opens
set-option -g default-command "reattach-to-user-namespace -l bash"
Select and copy text
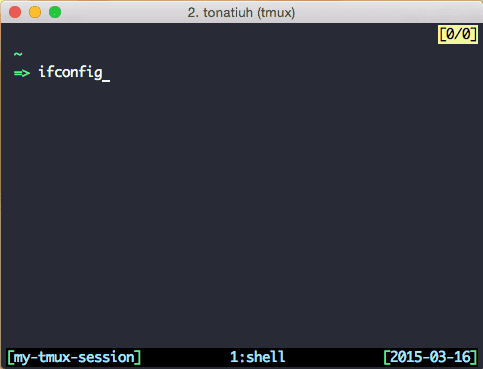
Now that the vi mode is set and rettach-to-user-namespace installed, let’s see how to copy text from a Tmux session. Let’s say you’ve run the ifconfig command because you wanted to copy your ip address. Now, follow these steps to copy that text:
Enter copy mode:
ctrl-b [. You’ll see a short highlighted text appear at the top right of the screen as in the following image (“[0/0]”).
Start moving across the text as you would do in Vim: with j, k, l, h, etc..
Once you get to the text you want to copy press the spacebar and start selecting text (exactly as you would do it in Vim).
Once text is selected press the
enterkey
Now that you have copied your IP address, paste it wherever you want.
Make text copying even more Vim-like
You can use v key to select text and y to copy it, just add the following to your ~/.tmux.conf file:
# start selecting text typing 'v' key (once you are in copy mode)
bind-key -t vi-copy v begin-selection
# copy selected text to the system's clipboard
bind-key -t vi-copy y copy-pipe "reattach-to-user-namespace pbcopy"
Effective pair programming
You can share the address of a Tmux session with someone else, and that person can connect to the session via SSH. Since the connection runs over SSH, it will be very lightweight. For the user connecting to the remote Tmux session, it will feel as if the session is running locally, providing the internet connection is fast enough.
Tmux with Tmate
Tmate is a tool that makes it very easy to create a Tmux session and share it with someone else over the internet. To share a new Tmux session using Tmate these are the steps you have to follow:
Install Homebrew:
$ ruby -e "$(curl -fsSL https://raw.githubusercontent.com/Homebrew/install/master/install)"
Install Tmate
$ brew update &&
brew tap nviennot/tmate &&
brew install tmateLaunch a new session with Tmate:
tmate
Copy the SSH URL given by Tmate on the Tmux session. An example is showed in the following image (message at the bottom: “[tmate] Remote session: ssh …”):
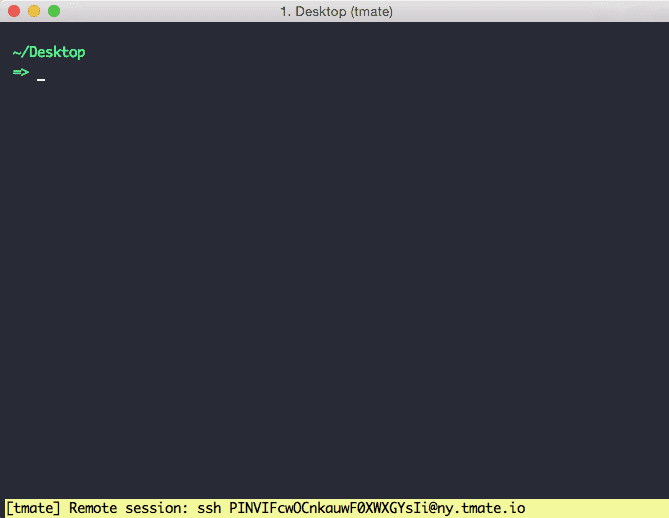
Ask the other person to access via SSH using the URL you just copied.
Now that you know how to make good use of Tmux’s pair programming feature, you can further improve the interactivity of your session by doing a voice call via your preferred provider.
~ Tweaks for Vim integration
Colorscheme background
When I first opened Vim through Tmux I found the colors weren’t being correctly applied. The background color was being displayed only where characters appeared. Here is an example:
This issue is due to Vim’s need of setting a different term parameter when ran through Tmux. To set the right term parameter just add the following lines to your ~/.vimrc file:
if exists('$TMUX')
  set term=screen-256color
endif
After updating the ~/.vimrc file, the color scheme is displayed correctly:

Static cursor shape
By default when Vim is run through Tmux, the cursor shape is always the same regardless of the current Vim mode (insert, visual, etc). This makes it hard to identify the current Vim mode. To fix this, you need Tmux to tell iTerm to update the cursor shape. You can do it by adding the following to your ~/.vimrc file:
if exists('$ITERM_PROFILE')
  if exists('$TMUX')
    let &t_SI = "\<Esc>[3 q"
    let &t_EI = "\<Esc>[0 q"
  else
    let &t_SI = "\<Esc>]50;CursorShape=1\x7"
    let &t_EI = "\<Esc>]50;CursorShape=0\x7"
  endif
end
Thanks to Andy Fowler who originally shared this tip.
Indentation at pasting
Sometimes, when pasting text into Vim the indentation of the text is changed, which is a problem when you paste a large amount of text. This issue can be prevented by executing :set nopaste before pasting. However, there is a better way to do this. By adding the following to your ~/.vimrc file, Vim will automatically prevent auto-indenting the text when pasting:
" for tmux to automatically set paste and nopaste mode at the time pasting (as
" happens in VIM UI)

function! WrapForTmux(s)
  if !exists('$TMUX')
    return a:s
  endif

  let tmux_start = "\<Esc>Ptmux;"
  let tmux_end = "\<Esc>\\"

  return tmux_start . substitute(a:s, "\<Esc>", "\<Esc>\<Esc>", 'g') . tmux_end
endfunction

let &t_SI .= WrapForTmux("\<Esc>[?2004h")
let &t_EI .= WrapForTmux("\<Esc>[?2004l")

function! XTermPasteBegin()
  set pastetoggle=<Esc>
inoremap [200~ XTermPasteBegin()
Thanks to Marcin Kulik who originally shared this tip.
~ Nice extras
Tmuxinator (automate sessions for your projects)
Let’s say you start coding for application A and you always create a Tmux session with three windows for that: “servers”, “editor” (for the project’s code) and “shell” (to run system commands). At certain point of the day you need to temporarily switch to application B, and you will create a Tmux session with the same windows arrangement you had for application A, with a few slight differences (such as the directory and some commands). With Tmuxinator, you can declare the configuration for each Tmux session and then create them with a single command! Pretty sweet.
Tmuxinator is a gem that allows you to automate the creation of Tmux sessions. It is done specifying the details of the sessions in the configuration files and then creating the sessions with a command.
Let’s see how to install Tmuxinator and how to add the configuration to start a project session. Install the Tmuxinator gem by running the following command:
$ gem install tmuxinatorNow that Tmuxinator is installed you can run the tmuxinator or mux commands from the system’s shell. Let’s create the configuration file for your first application as described above (three windows: “servers”, “editor” and “shell”), tell Tmuxinator to create and open the config file for this project:
$ gem install tmuxinatorAt this point the file ~/.tmuxinator/projecta.yml should have been automatically opened. In order to accomplish what is needed for project A you need to update the content of projecta.yml to:
name: project_a
root: <the-folder-of-project-A>

windows:
  - server: <command-to-start-application-server>

  - editor:
    layout: even-horizontal
    panes:
      - vim
      - <command-to-launch-tests-guard>
Once you have added the configuration to the Yaml file for project A, just run the following command to start the Tmux session:
$ tmuxinator start project_aOr, if you prefer, use the Tmuxinator alias:
$ mux start project_aThere you have it. Now, in order to start coding for project A just run the Tmuxinator command.
Find the official documentation in the Tmuxinator repo.
Pimp your Tmux bar
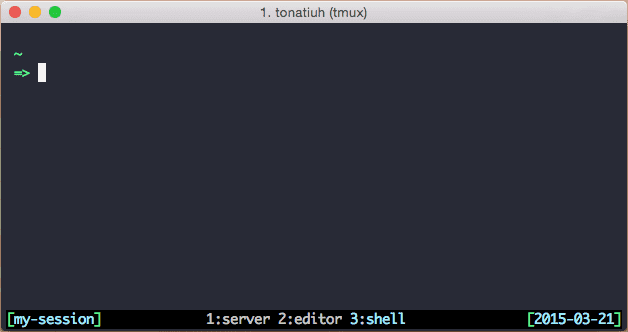
By default, the Tmux bar looks like the following (green bar at the bottom of the image):
You can change its appearance if you want. In my case I like something cleaner as in:
In order to accomplish it, I use the following settings in my ~/.tmux.conf file:
# Status bar
# colors
set -g status-bg black
set -g status-fg white

# alignment
set-option -g status-justify centre

# spot at left
set-option -g status-left '#[bg=black,fg=green][#[fg=cyan]#S#[fg=green]]'
set-option -g status-left-length 20

# window list
setw -g automatic-rename on
set-window-option -g window-status-format '#[dim]#I:#[default]#W#[fg=grey,dim]'
set-window-option -g window-status-current-format '#[fg=cyan,bold]#I#[fg=blue]:#[fg=cyan]#W#[fg=dim]'

# spot at right
set -g status-right '#[fg=green][#[fg=cyan]%Y-%m-%d#[fg=green]]'
~ Conclusion
In summary, we revised basic functionality and the most useful features Tmux offers. We also reviewed a few tweaks and extras. What are your impressions about Tmux so far? Are there any other features/tweaks that you have found useful? Let us know in the comments section below.
Thanks for reading!
~ Intro
If you are one of those devs who uses the terminal a lot and ends up with way too many tabs open, or practices pair programming, then this post is for you. During the last months, I’ve started using Tmux a lot. Since I’ve found it to be very useful, I thought I would write a post where I share a few recommendations and pro-tips. I’ll show you what Tmux is and how to use it in combination with Vim to make a more effective and elegant use of the Terminal.
So, this is what we’ll cover:
Tmux basics.
The best of Tmux
Windows
Panes
Sessions
Fast text navigation and copying
And a very neat pair programming feature
Tweaks to improve Vim integration.
Colorscheme background
Static cursor shape
Indentation at pasting
A few extras to enhance the Tmux experience.
Tmuxinator for session automation.
Changing your color of your Tmux bar.
An important thing to bear in mind, this is the tool stack I had installed while writing this post, I tested what I say here with these versions:
Tmux 1.9a
Vim 7.4
iTerm 2.1
Mac OS (Mavericks and Yosemite)
Let’s start!
~ The Basics
What is Tmux?
Tmux is a tool that allows running multiple terminal sessions through a single terminal window. It allows you to have terminal sessions running in the background and attach and detach from them as needed, which is very useful. Later on, we will see how to make the most out of that feature.
Here’s a screenshot of a Tmux session:
What you see in the image:
– Left: Vim
– Right: a system’s shell
– Bottom-left: the Tmux session name (“pomodoro-app”)
– Bottom-middle: the current Tmux windows (“app log”, “editor” and “shell”)
– Bottom-right: the current date
How to install Tmux?
In Mac OS:
Install Homebrew
ruby -e "$(curl -fsSL https://raw.githubusercontent.com/Homebrew/install/master/install)"
Install Tmux:
brew install tmux
In Ubuntu:
Run this on the terminal:
$ sudo apt-get install tmuxThe Tmux prefix
In order to isolate its own keyboard shortcuts from other shortcuts, Tmux provides a shortcut prefix. When you want to trigger a Tmux shortcut you will press the Tmux prefix and then the Tmux shortcut key. The prefix that Tmux uses by default is Ctrl-b (“Ctrl” key in combination with the “b” key). For instance, let’s say you want to trigger the shortcut that lists the current Tmux sessions, which is the s key. Here is what you will need to do:
Press
Ctrl-bkeys (Tmux prefix)Release
Ctrl-bkeysPress the
skey
A few recommendations:
If you have not already mapped the ctrl key to the caps-lock key and vice-versa I suggest you do it.
Calling ctrl from the caps-lock key is very practical. This is because when coding you need to call ctrl very frequently. Moreover, it is a lot easier/quicker given the caps-lock key aligns with the default position of your fingers in the keyboard.
I recommend changing the Tmux prefix to
Ctrl-a. Once the Ctrl key has been set to the caps-lock key, it gets a lot easier/quicker to callCtrl-ainstead ofCtrl-b, because the new prefix keys are very close to each other on the keyboard.
Here is what you need to add in your ~/.tmux.conf file to change the prefix to Ctrl-a:
unbind C-b
set -g prefix C-a
The config file
~/.tmux.conf is a file that Tmux reads every time a new session opens. It’s where the customizations for Tmux need to be placed. Suggestion: in the case that you need (and chances are you will) to apply a new change made to the without opening a new session, you can add the following line to the ~/.tmux.conf file:
# bind a reload key
bind R source-file
This way, once you have added a new change to the ~/.tmux.conf file, just press ctrl-b R to reload your configuration without having to open a new Tmux session.
~ The best of Tmux
Quick note: the screenshot shown here may differ slightly from what you see by default when you install Tmux. This is because I modified the status bar. If you want to do the same follow the steps on the “Pimp your Tmux bar” section of this post.
Panes
I like the idea of dividing the screen vertically, so that on one side of the screen I have Vim and on the other side I have the output of my code. I could even have another console if I wanted to. Here’s how Tmux makes it happen:
What you see in the image:
– Left side: Vim (at the top: a Ruby class file, at the bottom: a test file for the Ruby class).
– Right side: a bash session.
A vertical pane is easy to create. Once you have launched a new Tmux session just press “Ctrl-b %” and a new vertical pane will appear. Also, if what you need is a horizontal division then press “Ctrl-b “”. Navigating through Tmux panes is easy, just press the Tmux prefix and then any of the direction arrows depending on which pane you want to go.
Windows
In Tmux, a window is a container for one or more panes. Tmux windows allow you to arrange multiple panes inside windows depending on what you need. For instance, in my case I usually have one window called “server” for running the app’s server (where I can see the log), another window called “editor” (where I do the coding). One pane for Vim and another for running the code tests. And another window called “shell”, which is a bash shell where I can run system commands. Tmux windows are useful since they allow users to allocate panes inside of them, to see more about each pane by going to the window that contains it. This is an efficient use of the available screen space.
The list of existent windows in a Tmux session displays at the bottom of the screen. Here is an example of how Tmux displays (by default) the list of windows created. In this case, there are three windows: “server”, “editor” and “shell”):
In order to create a new window you need to press “Ctrl-b c”. To navigate through windows press Ctrl-b followed by the index number of the window you want to go. The index number displays next to the name.
Sessions
A Tmux session can contain multiple windows. Sessions are a neat feature; I can create a Tmux session that is exclusive to a particular project. To create a new session just run the following command on your terminal:
$ tmux new -s <name-of-my-sessionTmux sessions remain alive until you restart your machine or you explicitly kill the session. As long as you don’t restart your machine, you can jump from a project’s session to another as you need it.
Navigation through Tmux sessions
To get a list of the existing sessions, press Ctrl-b s. Here is an example of what Tmux will show you:
Each session listed has an ID number, starting from zero. In order to go to that session type the session’s ID number in your keyboard. In the case that you are not in Tmux but you have one or more sessions running just use:
$ tmux attachThis command will take you back to your Tmux sessions.
Fast text navigation and copying
I always disliked the fact that to copy content from iTerm2 quickly you need to use the keyboard plus the mouse. I think that there should be a quicker way to do it without having to use the mouse. Fortunately, Tmux allows for that, since it is run from the command line, where the use of the mouse is not allowed.
Navigate text
Tmux allows for text navigation in a way that is very similar to Vim. You know, where the k key goes one line up, w moves one word forwards, and so on. Yet you can increase Tmux’s similarity with Vim by telling it to use the vi mode. Here is what you need to add in your ~/.tmux.conf file to accomplish this:
# Use vim keybindings in copy mode
setw -g mode-keys vi
Send copied text to System’s clipboard
By default, when you copy text from Tmux, the text is only available to be pasted inside that same Tmux session. In order to make that text available to be pasted anywhere, you have to tell Tmux to copy to system’s clipboard. Here’s how to do it:
Install retach-to-user-namespace, this is very easy with brew, just run the following command:
brew install reattach-to-user-namespaceUpdate ~/.tmux.conf file
# invoke reattach-to-user-namespace every time a new window/pane opens
set-option -g default-command "reattach-to-user-namespace -l bash"
Select and copy text
Now that the vi mode is set and rettach-to-user-namespace installed, let’s see how to copy text from a Tmux session. Let’s say you’ve run the ifconfig command because you wanted to copy your ip address. Now, follow these steps to copy that text:
Enter copy mode:
ctrl-b [. You’ll see a short highlighted text appear at the top right of the screen as in the following image (“[0/0]”).
Start moving across the text as you would do in Vim: with j, k, l, h, etc..
Once you get to the text you want to copy press the spacebar and start selecting text (exactly as you would do it in Vim).
Once text is selected press the
enterkey
Now that you have copied your IP address, paste it wherever you want.
Make text copying even more Vim-like
You can use v key to select text and y to copy it, just add the following to your ~/.tmux.conf file:
# start selecting text typing 'v' key (once you are in copy mode)
bind-key -t vi-copy v begin-selection
# copy selected text to the system's clipboard
bind-key -t vi-copy y copy-pipe "reattach-to-user-namespace pbcopy"
Effective pair programming
You can share the address of a Tmux session with someone else, and that person can connect to the session via SSH. Since the connection runs over SSH, it will be very lightweight. For the user connecting to the remote Tmux session, it will feel as if the session is running locally, providing the internet connection is fast enough.
Tmux with Tmate
Tmate is a tool that makes it very easy to create a Tmux session and share it with someone else over the internet. To share a new Tmux session using Tmate these are the steps you have to follow:
Install Homebrew:
$ ruby -e "$(curl -fsSL https://raw.githubusercontent.com/Homebrew/install/master/install)"
Install Tmate
$ brew update &&
brew tap nviennot/tmate &&
brew install tmateLaunch a new session with Tmate:
tmate
Copy the SSH URL given by Tmate on the Tmux session. An example is showed in the following image (message at the bottom: “[tmate] Remote session: ssh …”):
Ask the other person to access via SSH using the URL you just copied.
Now that you know how to make good use of Tmux’s pair programming feature, you can further improve the interactivity of your session by doing a voice call via your preferred provider.
~ Tweaks for Vim integration
Colorscheme background
When I first opened Vim through Tmux I found the colors weren’t being correctly applied. The background color was being displayed only where characters appeared. Here is an example:
This issue is due to Vim’s need of setting a different term parameter when ran through Tmux. To set the right term parameter just add the following lines to your ~/.vimrc file:
if exists('$TMUX')
  set term=screen-256color
endif
After updating the ~/.vimrc file, the color scheme is displayed correctly:
Static cursor shape
By default when Vim is run through Tmux, the cursor shape is always the same regardless of the current Vim mode (insert, visual, etc). This makes it hard to identify the current Vim mode. To fix this, you need Tmux to tell iTerm to update the cursor shape. You can do it by adding the following to your ~/.vimrc file:
if exists('$ITERM_PROFILE')
  if exists('$TMUX')
    let &t_SI = "\<Esc>[3 q"
    let &t_EI = "\<Esc>[0 q"
  else
    let &t_SI = "\<Esc>]50;CursorShape=1\x7"
    let &t_EI = "\<Esc>]50;CursorShape=0\x7"
  endif
end
Thanks to Andy Fowler who originally shared this tip.
Indentation at pasting
Sometimes, when pasting text into Vim the indentation of the text is changed, which is a problem when you paste a large amount of text. This issue can be prevented by executing :set nopaste before pasting. However, there is a better way to do this. By adding the following to your ~/.vimrc file, Vim will automatically prevent auto-indenting the text when pasting:
" for tmux to automatically set paste and nopaste mode at the time pasting (as
" happens in VIM UI)

function! WrapForTmux(s)
  if !exists('$TMUX')
    return a:s
  endif

  let tmux_start = "\<Esc>Ptmux;"
  let tmux_end = "\<Esc>\\"

  return tmux_start . substitute(a:s, "\<Esc>", "\<Esc>\<Esc>", 'g') . tmux_end
endfunction

let &t_SI .= WrapForTmux("\<Esc>[?2004h")
let &t_EI .= WrapForTmux("\<Esc>[?2004l")

function! XTermPasteBegin()
  set pastetoggle=<Esc>
inoremap [200~ XTermPasteBegin()
Thanks to Marcin Kulik who originally shared this tip.
~ Nice extras
Tmuxinator (automate sessions for your projects)
Let’s say you start coding for application A and you always create a Tmux session with three windows for that: “servers”, “editor” (for the project’s code) and “shell” (to run system commands). At certain point of the day you need to temporarily switch to application B, and you will create a Tmux session with the same windows arrangement you had for application A, with a few slight differences (such as the directory and some commands). With Tmuxinator, you can declare the configuration for each Tmux session and then create them with a single command! Pretty sweet.
Tmuxinator is a gem that allows you to automate the creation of Tmux sessions. It is done specifying the details of the sessions in the configuration files and then creating the sessions with a command.
Let’s see how to install Tmuxinator and how to add the configuration to start a project session. Install the Tmuxinator gem by running the following command:
$ gem install tmuxinatorNow that Tmuxinator is installed you can run the tmuxinator or mux commands from the system’s shell. Let’s create the configuration file for your first application as described above (three windows: “servers”, “editor” and “shell”), tell Tmuxinator to create and open the config file for this project:
$ gem install tmuxinatorAt this point the file ~/.tmuxinator/projecta.yml should have been automatically opened. In order to accomplish what is needed for project A you need to update the content of projecta.yml to:
name: project_a
root: <the-folder-of-project-A>

windows:
  - server: <command-to-start-application-server>

  - editor:
    layout: even-horizontal
    panes:
      - vim
      - <command-to-launch-tests-guard>
Once you have added the configuration to the Yaml file for project A, just run the following command to start the Tmux session:
$ tmuxinator start project_aOr, if you prefer, use the Tmuxinator alias:
$ mux start project_aThere you have it. Now, in order to start coding for project A just run the Tmuxinator command.
Find the official documentation in the Tmuxinator repo.
Pimp your Tmux bar
By default, the Tmux bar looks like the following (green bar at the bottom of the image):
You can change its appearance if you want. In my case I like something cleaner as in:
In order to accomplish it, I use the following settings in my ~/.tmux.conf file:
# Status bar
# colors
set -g status-bg black
set -g status-fg white

# alignment
set-option -g status-justify centre

# spot at left
set-option -g status-left '#[bg=black,fg=green][#[fg=cyan]#S#[fg=green]]'
set-option -g status-left-length 20

# window list
setw -g automatic-rename on
set-window-option -g window-status-format '#[dim]#I:#[default]#W#[fg=grey,dim]'
set-window-option -g window-status-current-format '#[fg=cyan,bold]#I#[fg=blue]:#[fg=cyan]#W#[fg=dim]'

# spot at right
set -g status-right '#[fg=green][#[fg=cyan]%Y-%m-%d#[fg=green]]'
~ Conclusion
In summary, we revised basic functionality and the most useful features Tmux offers. We also reviewed a few tweaks and extras. What are your impressions about Tmux so far? Are there any other features/tweaks that you have found useful? Let us know in the comments section below.
Thanks for reading!
Hire top-tier talent
Guadalajara
Werkshop - Av. Acueducto 6050, Lomas del bosque, Plaza Acueducto. 45116,
Zapopan, Jalisco. México.
Texas
17350 State Hwy 249, Ste 220 #20807,
Houston, Texas 77064 US.
© Density Labs. All Right reserved. Privacy policy and Terms of Use.
Hire top-tier talent
Guadalajara
Werkshop - Av. Acueducto 6050, Lomas del bosque, Plaza Acueducto. 45116,
Zapopan, Jalisco. México.
Texas
17350 State Hwy 249, Ste 220 #20807,
Houston, Texas 77064 US.
© Density Labs. All Right reserved. Privacy policy and Terms of Use.
Hire top-tier talent
Guadalajara
Werkshop - Av. Acueducto 6050, Lomas del bosque, Plaza Acueducto. 45116,
Zapopan, Jalisco. México.
Texas
17350 State Hwy 249, Ste 220 #20807,
Houston, Texas 77064 US.
© Density Labs. All Right reserved. Privacy policy and Terms of Use.