A Progressive Introduction to Javascript Testing
A Progressive Introduction to Javascript Testing
In this series we will learn how unit, integration, and end to end testing help us not only to improve the reliability of our code, but also, with the appropriate application of these techniques, to improve the overall quality of our code, allowing us to simplify the overall complexity of our modules and the relationships between them.
Part 1: Introduction to Unit Testing
What is a Unit Test?
There are different definitions about what a unit test is; however, Martin Fowler already did a great job by finding the common characteristics that exist among those different definitions:
-
Unit tests are low-level, focusing on a small part of the software system.
-
Unit tests are usually written these days by the programmers themselves using their regular tools - the only difference being the use of some sort of unit testing framework.
-
Unit tests are expected to be significantly faster than other kinds of tests.
No matter the platform or the language you are using, these elements must be always present when you write these kinds of tests. Despite that, don’t forget that when the time comes you’ll have to make adjustments depending on what you need, and the best way to choose the most appropriate path is by being prepared. If you have previous experience in different scenarios you’ll have a better vision about how to resolve new and more complex challenges. Everything should be towards writing tests that are effective and useful.
Getting to Know the Application
The source code that we’ll use for these series can be found in the following URL: https://github.com/densitylabs/pokemon-list
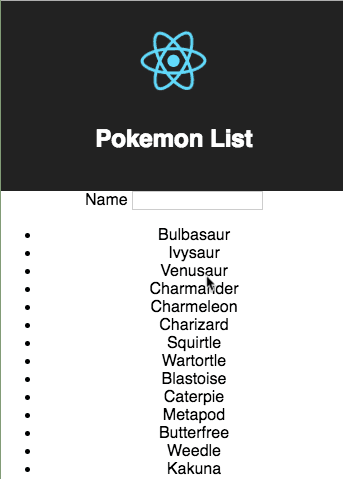
The application we’re going to work on is fairly simple, it was created using the create-react-app generator. The frontend is built with several components, with most of the logic contained in two of them: PokemonSearch and PokemonList. The first component is represented by an input element, that will filter the results in PokemonList every time we update its value.
A very simple backend in Node.js was added as well, it can be found in the server folder. This service will provide JSON information about all the Pokemon from the first generation. The service also includes an endpoint that serves all the types of Pokemon, which we’ll use in the future.
As shown above, the application couldn’t really be made simpler, but it has enough components and business logic for us to test it from different angles.
Running the Application
Once that you have downloaded the source code, it is necessary to install the applications using Yarn. If you have not installed it yet you can visit the yarn website for instructions.
When Yarn is ready, we can install the dependencies as easy as just running the following command:
$ yarn
Both the backend and the frontend can be executed in parallel using the command npm start or yarn start. Once they are running, a window will open in your default browser where you’ll see the application in action.
Jest
The create-react-app generator includes built-in integration with Jest as its test framework. If we go to the Getting Started section in their website, we’ll find out that the API that Jest exposes is quite small:
sum.js
function sum(a, b) {
  return a + b;
}

module.exports = sum;
sum.test.js
const sum = require('./sum');

    test('adds 1 + 2 to equal 3', () => {
      expect(sum(1, 2)).toBe(3);
    });
When we execute jest (in the case of our project, yarn test or npm test), the script will find all the test files whose name matches a defined pattern, in this case all the files that end in .test.js. When those test files are executed, Jest will expose several global functions, among which we will find:
beforeAll, afterAll, beforeEach, afterEach Also known as “hooks”, they allow us to prepare the conditions that we need to run all or each one of the tests and to clean up the workspace once we’re done.
test This function receives a string and a callback, the string describes the behavior that is going to be evaluated, and the callback includes the function calls to the module being tested, as well as the assertions. If any exception occurs inside of the callback the test will be marked as failed.
expect This function includes “assertions” (or matchers) that allow us to verify that the module and the data behaves as expected.
To know more about the global functions that Jest exposes you can refer to its documentation
Running the Tests
You can run the tests with the following command:
$ yarn test
This will leave a long-running process, every change that is made in the test or source files will trigger the tests until the process is stopped. This reminds us about one of the characteristics that are fundamental in unit testing: the tests must be fast.
If we observe the output of the tests we’ll notice the following:
PASS src/components/AppWrapper/AppWrapper.test.js
      ✓ renders without crashing (26ms)

    Test Suites: 1 passed, 1 total
    Tests: 1 passed, 1 total
    Snapshots: 0 total
    Time: 2.17s
    Ran all test suites.
A test already exists! Let’s see how it is defined:
it('renders without crashing', () => {
      const div = document.createElement('div');
      ReactDOM.render(<App />, div);
    });
It is pretty straightforward that this test is not very descriptive on what the module really does, it simply makes sure that the code does not throw any exceptions while it’s running. We can verify that the test will fail if something goes wrong by forcing a bug, to achieve that we will modify /components/AppWrapper/index.js to look like:
const AppWrapper = ({
      children
    }) => (
      <div className="App">
        <Headerx />
        { children }
      </div>
    );
The only change made was to add an x to Header so it reads like Headerx. If we save the file we’ll see that the test is starting to fail.
FAIL src/components/AppWrapper/AppWrapper.test.js
      ● renders without crashing
Once we have verified that the test has failed, we can undo our changes and verify that tests are passing again.
Testing React Components
We have seen that the test accomplishes its goal, but we don’t have very much to do besides that. What if we want to see how the rendered component looks like? What is its state at certain point of time? Or what text does the user read?
Can we do better?
Enter Enzyme!
Enzyme is a tool developed by Airbnb, and its goal is to make testing for React components more effective and enjoyable.
To add Enzyme to our project is as simple as installing some extra dependencies:
$ yarn add -D enzyme enzyme-adapter-react-16 react-test-renderer
The -D option tells Yarn that the dependency is meant for development only
To configure enzyme within our React project it’s necessary to create a new file called src/setupTests.js and add the following:
import Enzyme from 'enzyme';
    import Adapter from 'enzyme-adapter-react-16';

    Enzyme.configure({
      adapter: new Adapter()
    });
create-react-app will run this file automatically before running the tests, this way Enzyme will be ready to go!
Once installed and configured we can use it in our tests files by just importing it:
import {shallow, mount} from 'enzyme';
Enzyme exports the functions shallow and mount, these will wrap our component in a way that will allow us to navigate through its elements, verify the texts being rendered, and even simulate events.
If you have read the Enzyme documentation you’ll notice that mount and shallow expose almost the same API. We’ll see how these functions differ in practice.
Testing the AppWrapper Component with Enzyme
We are going to replace the contents of our AppWrapper tests with the following:
import React from 'react';
    import { mount } from 'enzyme';
    import AppWrapper from './index';

    const getWrapper = () =>
      mount(<AppWrapper />);

    test('renders without crashing', () => {
      const wrapper = getWrapper();
      expect(wrapper).not.toBeNull();
    });
This is basically the same test that we had before, but now Enzyme will handle the component rendering. But, do we have more advantages when using Enzyme?
Verifying the components
If we take a quick look at the application, we can divide it by the components that are inside AppWrapper:
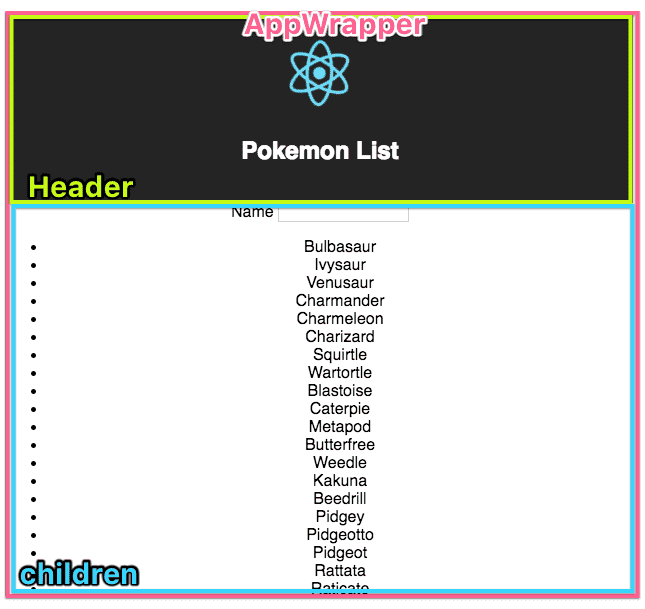
According to the image we can, for example, verify that the app logo and the title are rendered correctly when mounting the AppWrapper
test('renders the logo', () => {
      const wrapper = getWrapper();
      expect(wrapper.find('.App-logo').exists()).toBe(true);
    });
As you can see, we can use the css class selector along with the .find() method that Enzyme provides. When we do this, the wrapper will return us all the child nodes that matches the given selector.
In a similar fashion, we can select a node and verify if the displayed text corresponds to what we want to show:
test('renders the title', () => {
      const wrapper = getWrapper();
      expect(wrapper.find('.App-header').text()).toEqual('Pokemon List');
    });
If we check the console, we’ll see that all the tests are passing but, are we doing real unit testing now?
Isolating the tests
If we verify the contents of AppWrapper/index.js we’ll notice the following:
import React from 'react';
    import Header from '../Header';
    import './AppWrapper.css';

    const AppWrapper = ({
      children
    }) => (
      <div className="App">
        <Header />
        { children }
      </div>
    );

    export default AppWrapper;
Neither the logo nor the title are present in this module definition; however, both elements are being verified in the unit tests that are all currently passing.
In this case, we can recall one of the elements for unit tests: they need to be focused in a small part of the system. If we talk about small portions, in React the smallest portion would be a single component The behavior that is declared outside of the component should not be verified in the unit tests.
In order to fix our tests, instead of verifying the logo or title, we’ll simply verify that the Header is being rendered by our AppWrapper component:.
import Header from '../Header';
    // ...
    test('renders the Header', () => {
      const wrapper = getWrapper();
      expect(wrapper.find(Header).exists()).toBe(true);
    });
That’s it.
If we look closely at the component, we’ll also see that the child components are being rendered; and of course, we can also write a test for that:
// Replace getWrapper with
    const getWrapper = ({ children } = {}) => {
      if (children) {
        return mount(
          <AppWrapper>
            { children }
          </AppWrapper>
        );
      };
      return mount(<AppWrapper />);
    }
    // ...
    test('renders the children components', () => {
      const text = "I'm a child component";
      const children = <span>{ text }</span>;
      const wrapper = getWrapper({ children });
      expect(wrapper.find('span').exists()).toBe(true);
      expect(wrapper.find('span').text()).toEqual(text);
    });
The getWrapper function has been expanded, so it will include the child components in the AppWrapper in case they are declared.
You can verify that the tests are all passing, if you want to double check that the tests are accomplishing their goal, you can modify the AppWrapper definition and delete some of the elements.
One More Thing
By now, you should have already memorized the three elements of unit tests, if not here’s a reminder:
Unit tests are:
-
Low level and focus on small portions of a system.
-
Written by developers using their same day to day tools.
-
Fast.
What if I told you that there’s a way we could improve two out of these three elements in the tests we have done so far? Yes! There is a way, and to accomplish that we’ll start using enzyme.shallow.
import { shallow } from 'enzyme';
    // ...
    const getWrapper = ({ children } = {}) => {
      if (children) {
        return shallow(
          <AppWrapper>
            { children }
          </AppWrapper>
        );
      }
      return shallow(<AppWrapper />);
    };
But, why is shallow better for unit testing compared to mount? This is because shallow will render ONLY the elements that are defined in the tested component, nothing more. This means that, if we want to find the logo in the wrapper the test will fail.
test('renders the logo', () => {
      const wrapper = getWrapper();
      // this will fail
      expect(wrapper.find('.App-logo').exists()).toBe(true);
    });
Although, at first, this might look like a drawback this is actually a huge improvement and a great aid with writing effective unit tests. By using shallow we can guarantee that the functionality we are testing is present only in the component we are interested in.
Wrapping Up
We’ve already covered plenty of ground in this post. We’ve learned the essentials of unit testing and now we are familiar with the tools that help us make unit testing a painless experience, but there’s still much more to learn! In the next part of this series we’ll see how to apply unit testing not only to React components but also to other kinds of modules and business logic. We’ll also learn the importance of having our tests always passing and up to date, using practical examples.
Stay tuned! [Check us out!] (https://densitylabs.io/)
References And Further Reading
[https://martinfowler.com/bliki/UnitTest.html] (https://martinfowler.com/bliki/UnitTest.html)
Unit testing: How to get your team started - FunFunFunction #2 [https://www.youtube.com/watch?v=TWBDa5dqrl8] (https://www.youtube.com/watch?v=TWBDa5dqrl8)